Photography tips for beginners (DSLR edition)
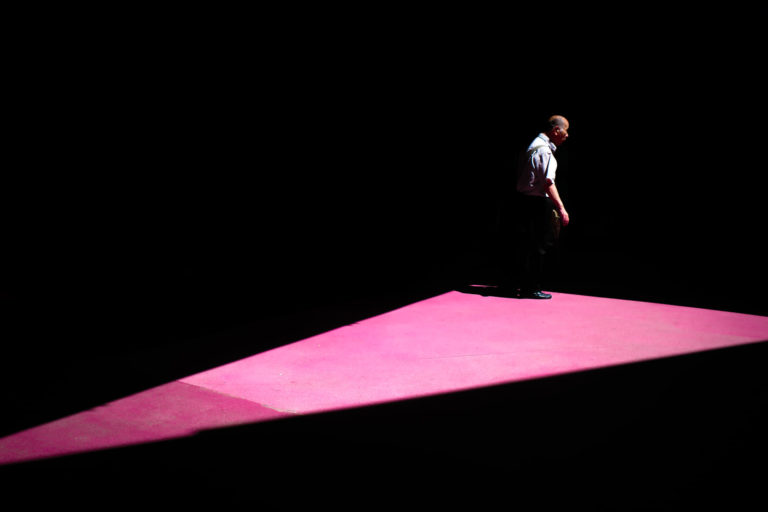
What do you think of the photo above?
I took it many years ago when I started learning photography, using a Canon DSLR and a zoom lens.
I take far better photos today, but let me say one thing – I remember taking that photo, and how much I enjoyed that day!
That was one photo of many thousands of enjoyable photos I’ve taken to this day, and photography should always be fun!
So, you’ve bought your first DSLR, or you’re about to buy one, but you’re going to need some tips on how to use it…
…so here you go, as a working photographer these are my photography tips for beginners, like you, with your first DSLR!
- Firstly, make sure you’re in the right headspace!
- My second best tip: Why zoom lenses won’t make you a good photographer!
- Strap in: Photograph tips for beginners (DSLR)
- Overcome “Shutter Fear”!
- Raw vs. JPG
- CTRL + L : Level up with Photoshop
- Video Zoom
- My best tip for learning photography – Accept criticism!
- Final thoughts on photography tips for beginners with DSLRs
Firstly, make sure you’re in the right headspace!
Photography is (most of the time) and art form. There’s no right or wrong, and what appeals to you won’t appeal to everyone.
I know for a fact most of my photographs are lost on people, and I’m fine with that. You should be too.
The most important aspect of photography is your own enjoyment of it.
(Unless you’re a pro and your clients expect a certain style or quality!)
Therefore don’t take everything here as gospel! Just guidance!
If there are any subjects you want covered, let me know in the comments. I’m always happy to help out.
Most of these photography tips for beginners relate to DSLRs or simple video cameras, and we’ll mostly focus on outdoor photography.
We’ll also cover a little bit of Photoshop, but don’t panic if you’re not hot on it.
My second best tip: Why zoom lenses won’t make you a good photographer!
I realise this is an odd way to start a tutorial on photography tips for beginners using a DSLR, but it’s honestly my best advice – zoom lenses suck for learning photography.
Yep, I know pretty much every photography beginner will start off with a zoom lens on their DSLR, so let me elaborate a little further.
As a beginner I had a stock Canon 18 to 55mm lens, and it wasn’t until I bought a fixed lens camera (Fuji X100) when I really learned about photography – most specifically, composition).
I remember being on a jaunt with photographers on my first outing with a fixed lens. Having a fixed lens forced me to consider positioning and different angles, which really helps figure out what works.
Then I looked at all the other photographers with DSLRs and zoom lenses, and I noticed all of them would stand in one spot, rotate, and zoom in and out.
Keep that in mind: It’s why zoom lenses won’t make you a good photographer. It stops you experimenting.
Don’t get me wrong, it’s fine to use a zoom lens, but my advice to you as a photography beginner is to move around, try different angles, and concentrate on composition – i.e. what you’re actually taking a photo of!
I’ll give you my first best tip later!
Strap in: Photograph tips for beginners (DSLR)
Getting to grips with camera settings – there’s no shame in using auto!
Did you know professional photographers often use auto mode?
Most of the time it works absolutely fine, especially with the capability of modern DSLRs, and will produce great photos.
Using auto frees you up to concentrate on the important aspects of photography, like what you’re actually taking a photo of!
Composition is everything!
(Well almost – it’s the most important thing).
Don’t be afraid of using auto as a beginner. It’s nothing to be ashamed of. And if you don’t plan to learn manual settings yet, feel free to skip to the next step!
Manual settings are fun, but only when you’re ready
If you want to explore manual settings the best way to learn is either shutter mode or aperture mode (often called shutter priority and aperture priority).
There’s a third factor to consider, which is ISO, but forget about that for now.
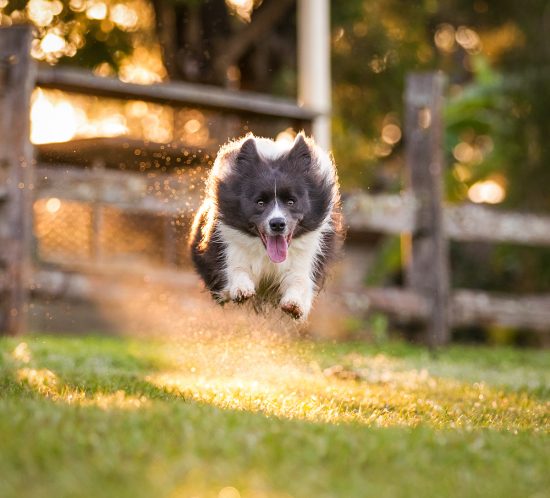
Shutter mode is great if you want to capture moving objects or people, such as birds or sports. Aperture mode is great for managing light, and what’s known as “depth of field”.
Depth of field, if you’re a beginner to DSLR photography, is how a photo has the subject in crisp focus, and the background (and foreground) soft and blurry.
I’m pretty sure every DSLR camera today has these modes, or if they don’t they must be a toy camera!
Shutter mode for beginners
For photography beginners it’s best to learn in daylight. Low-light night photography takes more skill, and more equipment (such as a tripod).
In daylight or good indoor light you’ll find a shutter speed of 1/160 (which is 1 in 160 fragments of a second) to work really well in most cases, such as taking a photo of a loved one or family.
If you take a picture of something moving, ramp up the shutter higher to 1/500th or more. This means the shutter is open for such a miniscule amount of time you won’t get any blur with the moving object or person.
Shutter speed will be the defining setting on whether you image is completely sharp or has motion in it to give a different viewing experience.
My college photography teacher (about 20 years ago!)
Once you’re mastered that, you can start to have some real fun and experiment!
Here’s a really fun example of using shutter priority – and I’m going to tell you exactly how I took this photo so you can try too!
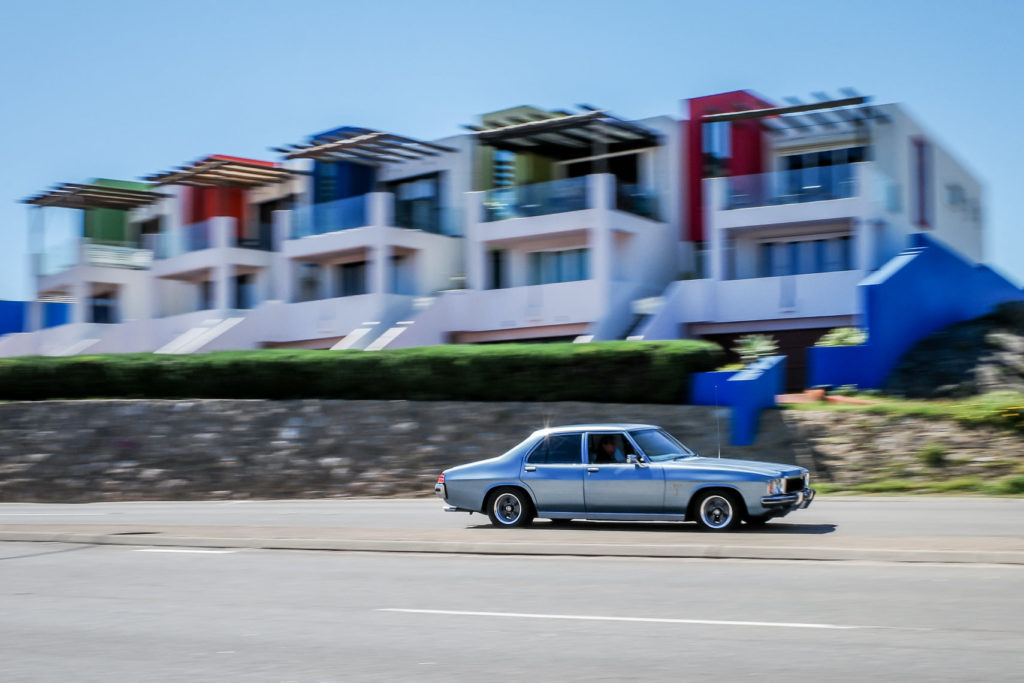
I took this using a shutter speed of 1/60, which is my goto for this type of photography, and it works really well for taking photos of moving objects – cars, people on bicycles, sports people.
All you need to do is stand in one place, wait for something to pass by, and follow the object as you click the shutter.
It’s easier than it looks, but be prepared to take some fluffs before getting it right. Thankfully there’s no end of cars to practice on!
(Note: for this type of photograph I usually pre-focus – I use back button focus which can be configured on most DSLRs – which saves the camera having to focus as you take the shot)
Here’s an even easier example – I took this photograph in Hanoi, Vietnam, and didn’t even track the moving objects (motorcycles).
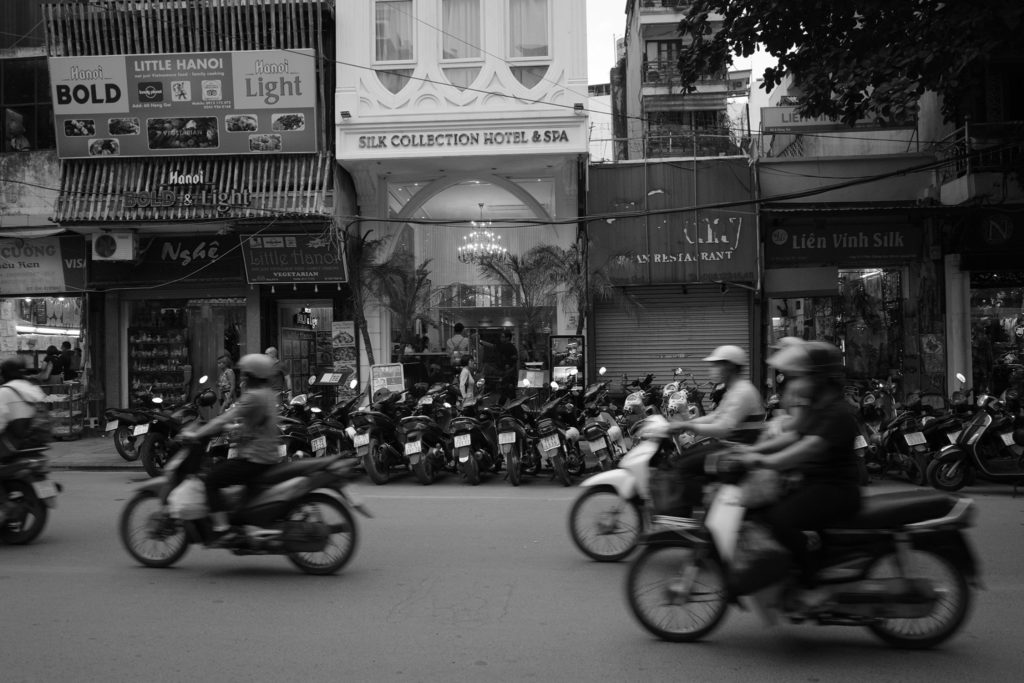
Motion can add a really cool dimension to photography, but all in good time!
Aperture mode for beginners – Instant improvement with Depth Of Field!
Let’s get the jargon out of the way – Aperture, AV, f-stop – it’s all the same thing. All it means is how wide the lens opens when you take a photograph.
The more the lens opens, the more light gets in. It’s as simple as that (kinda).
The most confusing part is a high aperture is actually a lower number, such as f2, and low aperture would be f18.
But lets forget about that!
Crank the camera to f2, f2.8, or whatever is the lowest number on your camera. This will blur the background and foreground the most.
Or give you what’s called the shortest depth of field.
f5 may actually be fine if you’re taking a portrait, and it depends on how zoomed are you in with the lens as well, and where you’re standing.
Using an aperture around f2 to f5 is a great technique for taking photographs of people (portraits) or inanimate objects, as having such blurry backgrounds or foregrounds means the focus is on exactly what you want – the subject.
You can practice aperture and depth of field on people or inanimate objects, so it’s easy to play around at home.
Or a cow:
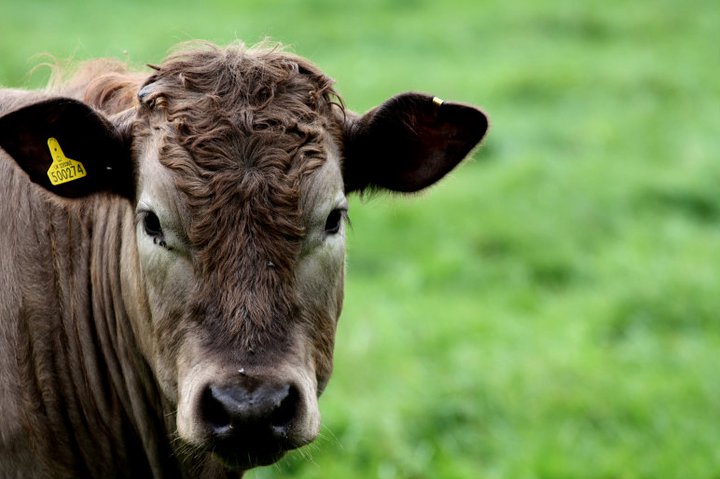
This was taken on a Canon F4 L lens (200mm), with an aperture of f4.
Zoom lenses also contribute to depth of field, so the more you’re zoomed in on a subject the more blurred the background will be.
Experiment!
A good tip – take one photograph with f2.8 (or whatever is the lowest number your camera will allow), then take the same photograph with f18 (or similar).
How do they compare?
Pretty different aren’t they!
Overcome “Shutter Fear”!
I’m talking about the shutter button – the button that does the magic!
Don’t be afraid to use it!
We live in the world of digital and there is no significant cost in taking another 10 shots, or even 1000 shots.
Another button you shouldn’t be afraid of using is the delete button (on your camera or computer).
It’s surprising how many beginner photographers have shutter fear!
I remember being like that myself when I bought my first DSLR. I was actually afraid each shot would have unnecessary mechanical wear, so I had to make sure I was taking a decent photo every time.
It’s a silly way of thinking, and modern DSLRs can take hundreds of thousands of photos and still keep going!
Shutter Rule 1: Always take the shot!
If you have a photo lined up but aren’t sure if it’s any good, take the shot anyway!
I’ve been taking street photos for years and even to this day some of my best photographs were those I wasn’t sure of when I took the photo!
If in doubt, take the shot anyway!
Me
Better yet, take multiple shots!
This leads me on to my second rule with the shutter button:
Shutter Rule 2: Fire Away! Fire Away!
By “hammering that button” you will start to see all the shots may’ve missed in the past.
Pressing the shutter button multiple times, or using a “burst mode”, is particularly noticeable with face shots or pets.
To give a real world example: I take a lot of street photography, and from a burst of 3 or 4 I may find only one of them has the magic – this can be an expression, gait, or stride.
It will be that one photo which makes the cut, so if you only take one shot you’re going to miss that magic.
I can shoot 10 frames a sec and I guarantee that one of those 10 will stick out as a better, more pleasing shot.
J Mascis, portrait photographer
So why is this?
The face changes constantly – expression, look, eyes blinking, mouths moving, a smile coming or going, or a simple lean of the head or lift of the chin.
As a beginner, if you take one shot I bet you anything there’s a 50 percent chance of the person blinking.
Most of the time we don’t even notice when we take the shot, because we’re faffing around with the camera.
Multiple people at once, and you’ll almost certainly fail with a single photograph!
Get used to pressing the shutter button at least a few times. It should quickly become a habit which will make you a much better photographer.
SAY NO TO SHUTTER FEAR!
Oh, and try different angles too, with multiple shots for each!
Raw vs. JPG
The great and (mostly) pointless debate!
I’m going to cover the differences between raw and jpg (or jpeg), because it’s the done thing, but quite honestly it doesn’t matter in the slightest if you’re a beginner, hobbyist, or even (most of the time) a professional.
What is JPG, and why is RAW (apparently) better?
JPG is a lossy format, which means it’s not as good quality as a RAW file. Jpg is also a much smaller compressed file so will take up less space on your memory card or computer.
I studied graphics at University, and even though that was (cough) quarter of a century ago, but I still remember a lesson on jpg compression.
Without going into too much detail, a RAW file contains information for every pixel in the image.
Jpg however, will contain information like the next 15 pixels are black. It bulks up pixels to save the amount of information needed to store for each one.
The more compression a JPG is, the more information is lost. For example, if those 15 pixels were a combination of black and various dark greys, a more lossy Jpg will store them all as black.
So you lose quality for the sake of a very small file size.
25 years ago this mattered far more than it does today. SD cards were small, hard drives were expensive, and dial up modems meant images on the web would take forever to download to your computer.
Should I use RAW or JPG?
These days, with the amazing resolution of modern day DSLRs, you can print JPGs on a 1.5m x 1m canvas and they still look awesome.
However, if you want to really edit your photos to the cows come home, and have complete control over colour and levels, and may save a photo which is overexposed or underexposed, then use RAW and suck up the hard drive space.
If your photos will end up on social media – Facebook, Instagram, or Pinterest – then they’ll end up compressed anyway, so JPG will save space.
Some cameras these days also come with some excellent JPG simulation modes, and finding which one works for your style of photography will mean far less editing for a professional look and feel!
If in doubt, toss a coin!
CTRL + L : Level up with Photoshop
If you use Photoshop, learning how to use levels (CTRL + L) will dramatically improve the quality of your photos.
If you use Lightroom (which I find much better because it’s simpler), then you’ll find levels in that too.
Adjusting levels will be the single most effective way to make your photographs more attractive.
Photo Events (website)
Adjusting levels is an easy way to darken and lighten your photographs, giving them more contrast and add tonal depth.
Some of you will see the histogram in Photoshop looks very much like the one you get on your camera in the info section when reviewing an image.
Don’t worry too much if contrast, tonal depth, and the histogram seem confusing. As a beginner you only need to be minimally aware. Faffing around with levels with give you the best grasp of how they work.
Try the following three steps to get a feel for levels.
You can adjust the sliders using the little triangle bases with your mouse left and right. These are the ones directly under the “mountain” of black.
- Move the left slider until it reaches the left had edge of the histogram mountain.
- Move the right hand slider until it reaches the right hand edge of the histogram mountain.
- Move the middle slider until it looks good to you.
Did you find your photograph has dramatically improved?
You should find adjusting the levels improves the contrast of the image to something more appealing to the eye. You can even try moving past the edges to see if it looks good to you.
One big tip: Never overdo it in editing if you want to keep realism in your photos. I know it’s personal preference, but I hate seeing photos of insanely unrealistic vibrant sunsets. Especially when they win photography competitions.
Usually when I edit a photo, I adjust a level to what I think works, then I marginally pull it back a little towards “normal”.
Video Zoom
This wouldn’t be a complete guide to DSLR photography tips for beginners if I didn’t mention video.
So here’s my best video tip:
Video zoom sucks.
If there is one thing that makes a video look amateurish it’s overuse of the zoom button!
It looks cool in camera but rarely translates onto screen with the same gusto.
Sure, you can have power zooms to empathise an action or a long slow zoom out to reveal an amazing landscape, but otherwise it can be a real downer.
Like any effect, use video zoom sparingly to showcase a visual.
Jason, Cine Pictures Ltd
Better idea in many cases is to let the action come into and out of camera. Let the story breathe and speak to the viewer.
Never be afraid to get in close. This applies to your photography as well as video.
I confess I’m not a fan of video, but understand the importance of DSLR video capabilities in our modern world of YouTubers and influencers.
Thankfully, there are reams of YouTubers cranking out guides on DSLR video techniques!
My best tip for learning photography – Accept criticism!
Criticism, or better yet constructive criticism, is your best tool for learning and improving your photography.
In my experience most beginner photographers fail to accept any kind of criticism whatsoever. Many professional photographers are no different.
But how can we learn and improve if we don’t listed to the opinions of others?
When I studied photography in college we were given tasks. One was a photo of something in the garden, and I thought I nailed it with a photograph of a beautiful bird box.
In class each of our photos was shown on the projector, and I eagerly awaited mine while we cycled through the other rubbish.
When mine came up, the teacher immediately drew everyone’s attention to a blurred branch in the foreground, partially obscuring the bird box.
I hadn’t even noticed, yet it was my photo!
Yes, I was disappointed the teacher didn’t exclaim “top marks”, but I took his feedback on board and many of my subsequent photographs benefitted from his criticism.
That’s why constructive criticism should always be accepted as a positive tool for us to improve, no matter how good we think we are.
Even blunt, cruel criticism we can learn from. If people hate our photography, it’s worth considering why.
What can we do better?
How can we improve?
Use criticism wisely!!
Final thoughts on photography tips for beginners with DSLRs
We’ve reached the end of this short guide on photography tips for beginners (DSLR).
I hope you’ve enjoyed it, and most importantly I hope you’ve learned a little something which will make you a better photographer!
Please feel free to share this guide to your social media photography groups, or leave a simple thank you (feedback, or even constructive criticism) in the comments!