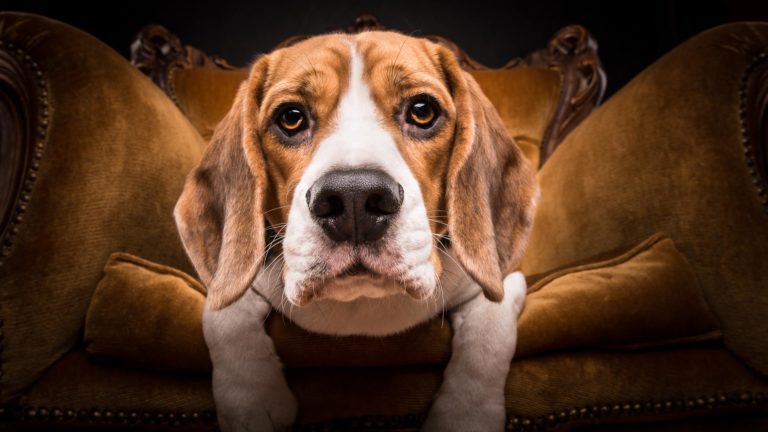
Dog photography tips & tricks: For Beginners!
I know how much you want to take great photos of your dog, which is why I’ve put together my top 10 dog photography tips and tricks!
They’re aimed at beginners, but even if you’re intermediate or professional I’ll hopefully include tips and tricks you’ve never thought of!
Please keep in mind – these dog photography tips and tricks will get you off the ground running, but the final tip to practice, practice, practice is the only way to become a true bonafide professional dog photographer!
The main thing is to have fun and enjoy time along the way with your dog. You don’t need to master these 10 dog photography tips in one go – there’s no reason you can’t work on one today, and another tomorrow.
Oh, and if you want to know more after reading this guide, then later I’ll tell you some of my best books on dog photography and how I became a successful Instagram “pet influencer”!
Give it time, have fun!
Let’s begin!
- 1. Location location location!
- 2. Pay attention to the light!
- 3. Use a fast shutter speed!
- 4. Get down low!
- 5. Use the right lens!
- 6. Be steady, be stable!
- 7. Focus!
- 8. Shoot continuously!
- 9. Re-create the action!
- 10. Practice! Practice! Practice!
- Further reading – some of the best dog photography books
- A quick summary of these dog photography tips & tricks
1. Location location location!
When it comes to photography, location is everything. The same is true for dog photography!
While your furry friend may be the star of the show, the background can make or break a photo.
To get the best results, it’s important to choose a location that complements your dog’s personality and fur colour.
Most of the time I get the best results from a park, beach, or open area. If your dog is full of energy then these will be the perfect spots, both for catching action, but also getting simple out of focus backgrounds.
Generally I avoid shooting under the shade of trees, but sometimes for lighter coloured or white dogs setting up the photo shoot in a shady spot may achieve good results.
Ultimately, the best location for your dog photography session is somewhere that makes both you and your pup feel comfortable.
With a little planning, you’re sure to end up with some great shots!
Don’t be afraid to experiment! It won’t take you long to find out what works for you and your dog.
I find it’s only when I view the photos on the computer I can see what works the best, so pick a location close to you and prepare for a few photography sessions!
2. Pay attention to the light!
Light is so important in dog photography, but thank fully it’s much easier when you consider the following tips!
Firstly, plentiful light is a must in creating sharp, in-focus action photos. Lots of light allows you to use a fast shutter speed and helps the autofocus system by providing more contrast to lock onto.
In low light you require the lens to be open for longer to absorb more light, which means blurry dogs.
That said, low light dog photography can offer wonderful results, but only possible if your dog knows how to stay still!
Let’s take a look at the best light for dog photography in both outdoor and indoor settings.
Outdoor light
Generally speaking, natural light is always going to be your best bet, but avoid harsh Aussie midday sun.
Once you’ve found your location, take a minute to consider the light. Where’s it coming from? How bright is it? Are there any distracting shadows? What’s the quality of the light – is it soft or harsh?
On a sunny day, shoot at the end of the day – early morning or late afternoon – and shoot with the sun behind you. Even though it provides the most intense light, avoid shooting in the middle of the day – the direction of light from overhead is too harsh in Australia, and unflattering on your dog.
If shooting backlit action, make sure there is enough light to create contrast in your subject for the camera’s autofocus to lock onto, and avoid flare by making sure the end of your lens is shaded from the sun.
On cloudy days, don’t shoot too early or too late as the intensity of light is going to be drastically reduced. It’s especially important to steer clear of sources of shade when it’s cloudy. Clouds create soft, diffused light which means you can shoot from more directions – it can really open up the background possibilities of the location.
Indoor light
If you’re shooting indoors, position your dog near a window with plenty of natural light.
A great tip is having that light side on to accent the contours of your dog’s face (a technique I learned from street photography!).
Backlit photos can also offer a really cool composition, especially for more senior dogs to give a feeling of calm and sophistication.
Backlighting from windows is a technique you often see in films. Bladerunner is a great example, but whenever you’re watching a sci-fi film or drama, take note of how many scenes are shot in relative darkness and backlit from a window – you’ll be surprised!
Avoid using flash. You’ll startle the dog and the photo shoot will go down the pan. Not to mention causing red-eye and rubbish photography.
I said it before on tip #1, but you’ll find it applies to all these dog photography tips – Experiment!
With a little patience and practice, you’ll be able to capture some truly incredible photos of your dog.
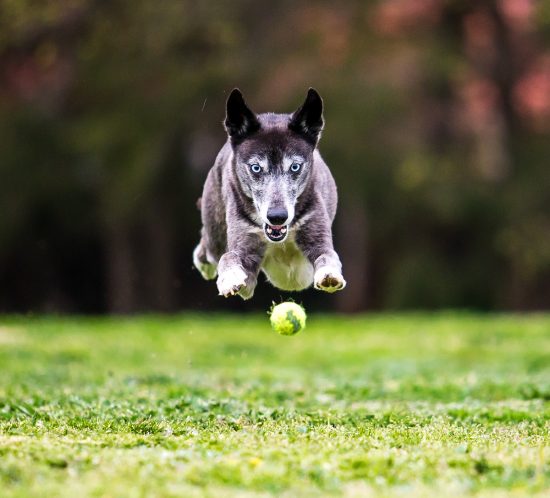
3. Use a fast shutter speed!
The number one reason that people end up with blurry images when taking action photos is a shutter speed that is too slow to freeze the motion.
You simply MUST use a fast shutter speed when photographing a dog in motion!
So how fast does your shutter need to be for dog photography?
Outdoor action!
For action photographs I like to shoot at a minimum of 1/1000 second. Faster if possible, but as a general rule – the faster the shutter the more light you need.
The easiest way to learn is to put your camera on shutter priority, and let it figure out aperture for you.
Another factor is ISO which you want as low as possible (800 or lower fixed). The only reason you’ll want a higher ISO is if you want a fast shutter in lower light, so leave that for when you’re more experienced!
1/1000 works great for a dog running towards you, or for capturing general movements. But if you’re taking a photo of a dog running passed you or jumping then you’ll need an even faster shutter – a minimum of 1/1600 sec.
If water is involved, such as water droplets in rain or your dog running through a stream, then 1/1600 sec or preferably higher will capture those water droplets perfectly. Especially if they’re catching the light!
Less action or indoor dog portraits
You’ll still need a fairly fast shutter if your dog is sitting or the light is lower (such as indoor photo shoots).
Dogs are easily distracted and tend to move around a great deal even when sitting, especially if you’re fussing around with a camera and trying to get them to look at you.
I consider 1/250th of a second an absolute minimum, but 1/500th of a second is better if there’s enough light.
If those shutter speeds aren’t working for you then see if you can add more light by moving to a brighter area.
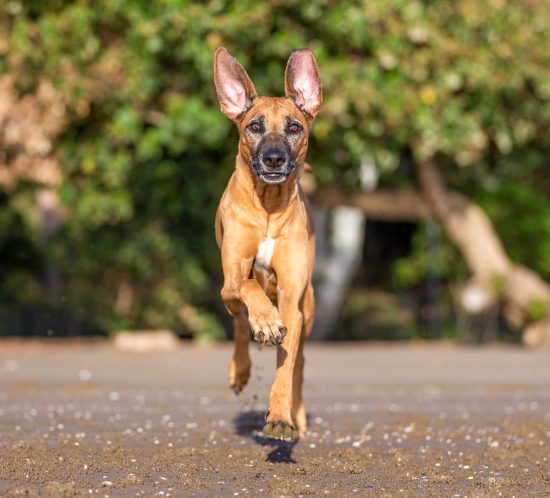
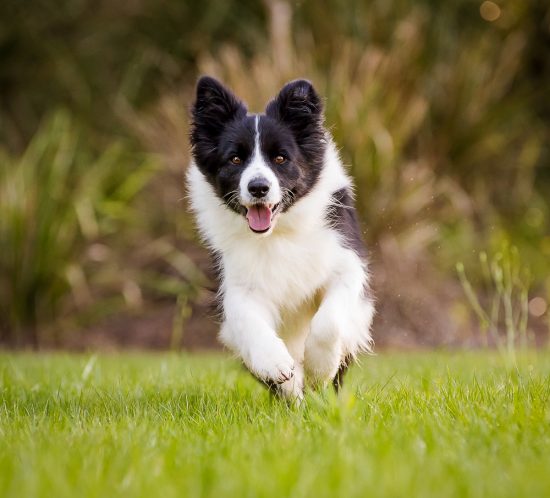
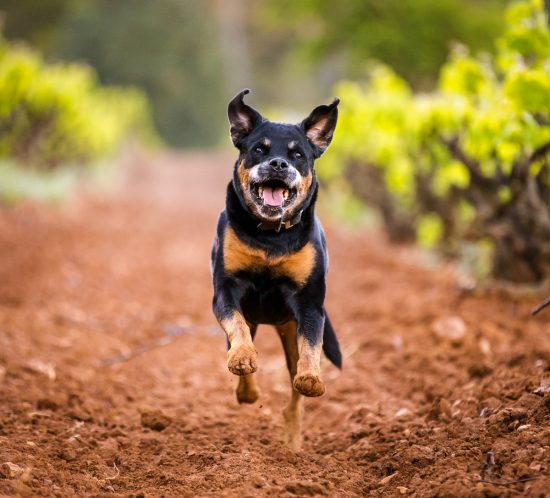
4. Get down low!
I kid you not, the best photos of your dog will be from their level!
It’s a great angle for all aspects of dog photography, but especially for action shots.
Shooting at dog level gives a more accurate perspective and sense of scale, and allows you to capture expressions and get a sense of their impression of their world.
Here’s a great example:
Jumping shots require a low angle to help create visual space between the dog and the ground, resulting in much more visual impact. Or simply put, it makes it look like they’re jumping higher!
Have you seen snowboarding or kite-surfing action shots where it looks like they’re higher than a house? Same principle!
You’ll find most people take photographs of their dogs from their level, which is how they’re used to looking at their dog. But trust me, it doesn’t work.
Getting on all fours (or simply sitting on the grass) is one of my best dog photography tips!
As an added bonus, when shooting with the sun behind you, being very low helps get your shadow out of the way. Nothing ruins a good dog photograph than an imposing shadow!
5. Use the right lens!
Dogs in action are usually easiest to follow from a distance, using a long lens, preferably a zoom.
A zoom lens is also the best way to get a beautiful depth of field, which means your dog will be in focus but the background will be soft and blurred out.
There’s a coveted technique in photography called bokeh, which can be achieved by having lights in the blurred background – something for you to consider when you find a location!
If you haven’t bought a camera yet, then I wrote a post previously about the best cameras for dog photography – hopefully that will give you a great starting point if you’re yet to decide!
Let’s take a look at what lenses are best for dog photography, and why:
Telephoto zoom lenses
My favourite lens to use when shooting action is a 70-200mm f/2.8 telephoto zoom.
Cheaper zoom lenses with large ranges (i.e. 50-300mm) are handy for general photography, but often don’t cut it when it comes to capturing dogs in action. They struggle to keep up with the fast movements, and variable maximum apertures can cause exposure inconsistencies.
Sorry, that sounded a bit technical! But if you’ve tried to track a moving object through a telescope you’ll know what I mean!
Most DSLRs have an option of a moderately decent 70-200mm lens which is absolutely fine if you’re learning dog photography. These lenses wouldn’t break the bank, but you may outgrow them with experience.
Prime lenses (they’re better, right?)
Shooting action with prime (fixed focal length) lenses is definitely possible, though it can make life a bit harder not being able to zoom when the subject is rapidly changing distance from you.
Prime lenses also cost more, and there’s no point investing in one unless you’re confident you know what focal length you want.
That said, most pro dog photographers use prime lenses when they’re familiar with the location and lighting. The reason being prime lenses can offer better quality results once the lens has been mastered.
Wide angle lenses
Getting amongst the action and using a wide angle lens can be fun and offer great results!
By wide angle I mean anything 28mm or lower, but mostly under 20mm. When you see property photographs from a real estate agent where the rooms look huge when they really aren’t? That’s what wide angle lenses do!
A good wide angle technique to try is “shooting blind”, which means shooting without looking through the camera’s viewfinder, holding the camera down low.
Sometimes I use a wide angle lens from grass level, getting a few blurred blades of grass in the foreground. You can get some awesome perspectives of your dog with this method!
Just aim as best you can. Wide angle lenses are very forgiving for dog photography, as it’s hard not to miss. If your camera has a decent resolution you can always crop the photo on your computer (I know purists hate to do this, but I do it and it works).
If you’re not getting enough in focus then increase your depth of field. By this I mean an aperture of f8 all the way up to f20 – this keeps more of the scene in focus. Using aperture priority on your camera is the easiest way to achieve this, but note in low light this can result in a shutter speed which is too slow and causes blur.
The more you practice this technique, the better your aiming accuracy becomes, and the more in-focus shots you’ll end up with!
The benefit of digital cameras and loads of SD card space is you can take loads of photos and see what works. Experiment!
6. Be steady, be stable!
It may seem obvious or even trivial, but this is such an important tip!
Holding the camera as steady as possible is vital in the success of sharp action photos.
The more stable you are, the less chance there is of your aim, focus or ability to follow the action being compromised.
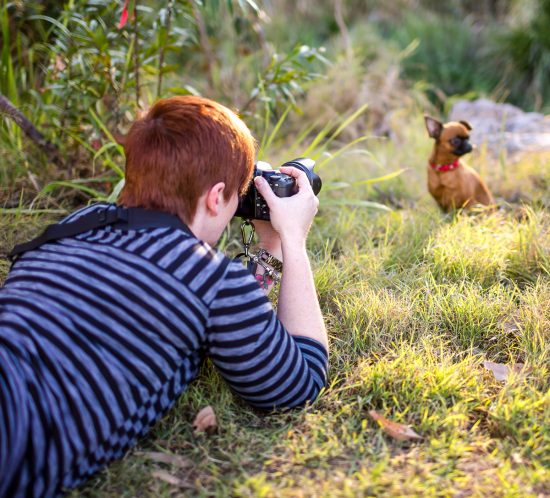
Some tips on how to be stable:
- Lie down on your belly facing the action, with your elbows on the ground for stability.
- Sit cross legged with your elbows on your knees or (depending on your flexibility) on the ground in front of you.
- Lie sideways or slightly back with your elbow out wide.
- Brace your shoulder against something solid.
- Use a monopod if the action is not too random – for example – show dogs trotting around the ring.
Learn to hold your camera in the most stable way, especially with heavy DSLRs and a big lens! Most photographers support the weight of the camera with their left hand on the lens, but you’ll find a preference for both landscape and portrait dog photography.
I saw a dog photographer once resting the lens on her upper arm/shoulder – so whatever works!
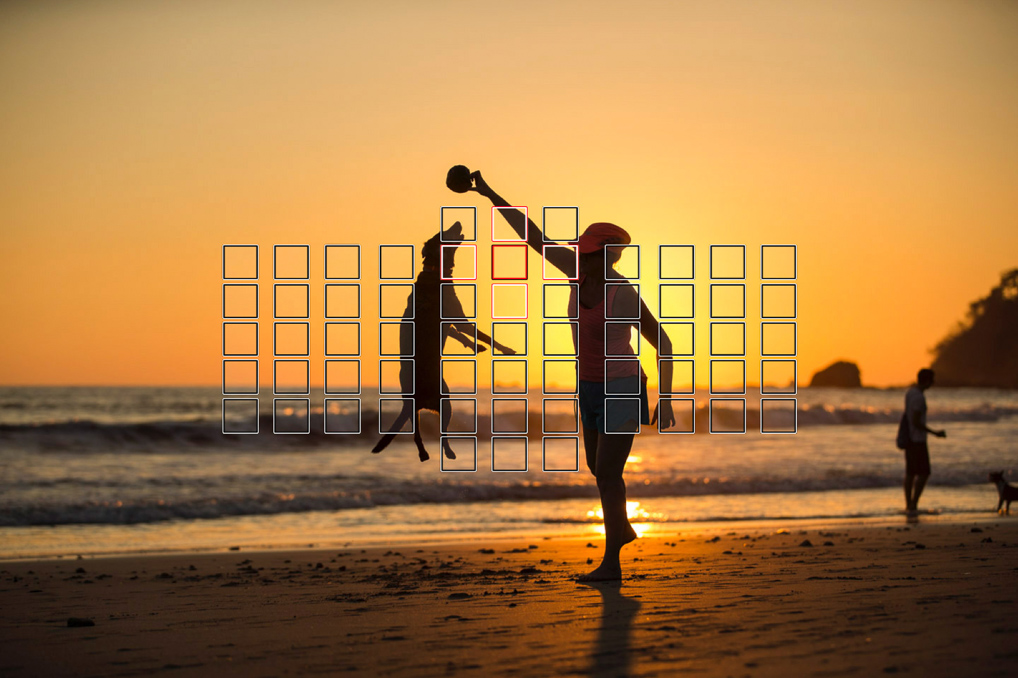
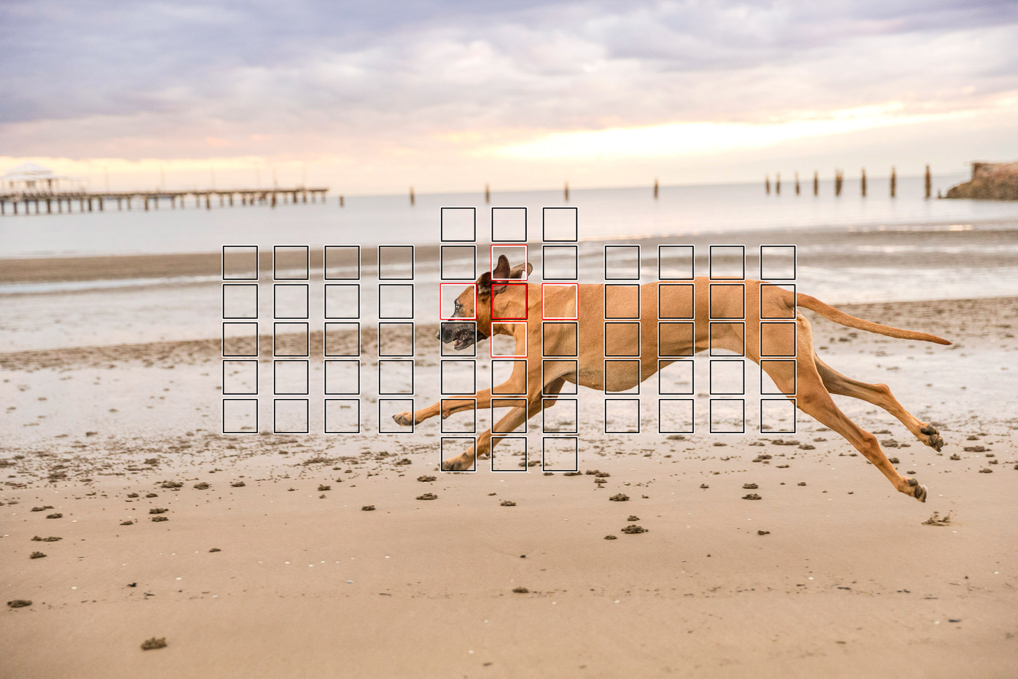
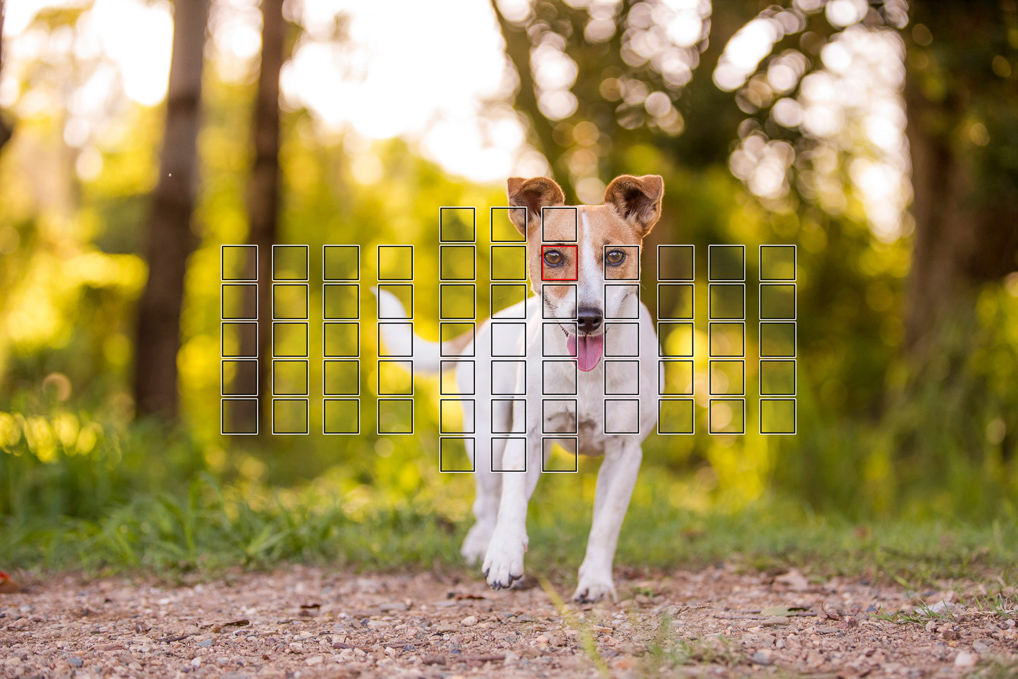
7. Focus!
Getting your dog sharply in focus for action shots is possibly the most important technique of all – and the hardest!
Depending on your camera, you’ll have various focus point options. I’ve found for action, a single focus point, or a single point plus surrounding assist points, is best.
Always read your camera’s autofocus system (or YouTube!) to see what your available options are.
You should be using continuous autofocus when photographing ANY moving animal. On a Canon this is called AI Servo, or AF-C on a Nikon.
Continuous autofocus is the best way to lock on and track your dog’s movement.
One thing I’ve always done with my cameras is to use back button focus. Most cameras allow this as a menu option, and it means you press the back button to focus prior to pressing the shutter button. It takes a bit of time to get used to, but the benefit is when you take that
If you use Adobe Lightroom, download the Show Focus Points plugin –www.lightroomfocuspointsplugin.com
The images below use the Show Focus Points plugin to display an overlay of active focus points – this is so helpful when diagnosing focusing issues with your Canon or Nikon DSLR.
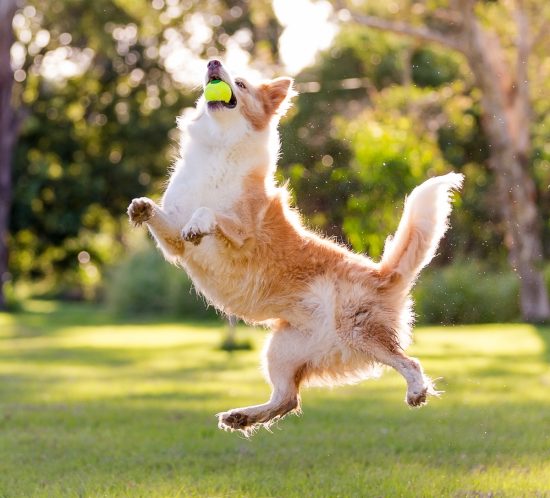
8. Shoot continuously!
This is my easiest tip of all, and such a great way for you to get great action shots of your dog!
Shoot continuously!
Ok, not for the entire photo shoot, but when your dog is doing what you want – running towards you, about to leap, running through a stream.
Most cameras call this burst mode, which allows you to hold the shutter down and it will keep capturing photos until you release the shutter.
Shooting at multiple frames per second – the highest frame rate your camera is capable of – helps increase your success rate and gives you more shots to choose from.
This increases your chances of obtaining that one “perfect” shot in the dog’s stride, or at the very top of their leap.
All the other photos you can delete – I encourage you to get in the habit of doing this, otherwise your hard drive will fill up quickly. Cull any bad photos immediately!
9. Re-create the action!
Rapid motion and direction changes can be tricky to capture, but with these simple tips it’s easier than you may think to re-create the action!
Dogs can be more predictable if you stage a situation correctly!
You could start by photographing the dog running towards you, as this is easily re-created time after time so you can practice.
Depending on your dog’s level of training, you could do a “stay” and recall, or have them fetching something back to you. If you have someone to help out you can get them to throw a ball or toy towards you, encouraging your dog to run at you.
Creating a predictable path can also be used to get the dog running across in front of you, which is great for creating panning shots. Again, you can use a friend to throw the ball across the scene, and use continuous shooting to capture the perfect shot!
Indoors, or for more portrait dog photography, keeping your dog calm and enticing them with treats is the best way to get them to pose and look at you.
If all else fails, play a YouTube video on your phone for “dog whistle sounds” – great for getting their ears to prick up for that inquisitive and alert look!
10. Practice! Practice! Practice!
Like most things you want to get better at in life, the key to obtaining consistently great action photos is to practice!

It’s not just dog photography techniques you’ll master, but these dog photography tips will help you become a better photographer in general.
Sports and wildlife photography is very similar in terms of fast shutter speeds, zoom lenses, and depth of field.
Mastering lighting, being aware of light sources, different types of light, and the contrast of light and shadow are skills used in all styles of photography!
The best way to practice dog photography is getting your dog to do something on repeat. Say, jumping for a ball or jumping into a lake – can provide a great opportunity to set yourself up for the shot and practice over and over, increasing your chances of success.
By breaking the process down into individual steps (the whole premise of this series!) you can work out which part isn’t working so well for you and concentrate on practicing to improve that one aspect.
Further reading – some of the best dog photography books
If you’re old fashioned like me, you’ll know the best way to learn something is a good old fashioned book.
Here are some of what I consider the best dog photography books, and these will go into far more detail, with better examples, than and blog post can do.
You’ve read this far, so you’re already up to speed on the basics – why not brush up on your skills even more?
- Dogtography: A Knock-Your-Socks-Off Guide to Capturing the Best Dog Photos on Earth by Kaylee Greer – Kaylee is the absolute master when it comes to dog photography. This book is an absolute must. There’s so much information in this book, such as how to read your dog’s body language, capturing the perfect expressions, action shots, and how to develop your own style.
- Dog Photography for Dummies by Kim Rodgers & Sarah Sypniewski – this book is a godsend for any novice learning dog photography! It even covers dog photography with humans as well as getting started with your own pet photography business.
- How to Make Your Dog Famous by Loni Edwards – this book is fantastic if you want to build a brand with your dog, with lots of sample pictures and information. It’s aimed at the new wave of “pet influencers” on Instagram, so people just like you and me!
If they’re not some of the best dog photography books, I don’t know what are! If you have any other suggestions, let me know in the comments below!
A quick summary of these dog photography tips & tricks
My final thoughts? There’s no magic button, and you won’t become the best dog photographer overnight, but practicing these tips and tricks will really get you off the ground running.
You have to put the work in, but you’ll have fun doing it. At least if you’re playing fetch in the process, there won’t be any complaint from your doggy subject! You’ll also have wonderful photos of your dog to keep forever.
So, I hope these dog photography tips and tricks help you! If they do, make sure you come back to this page and post your photos in the comments! I’m happy to offer an opinion, tips, or constructive criticism as a professional photographer – buy only if you ask!